Visualizer
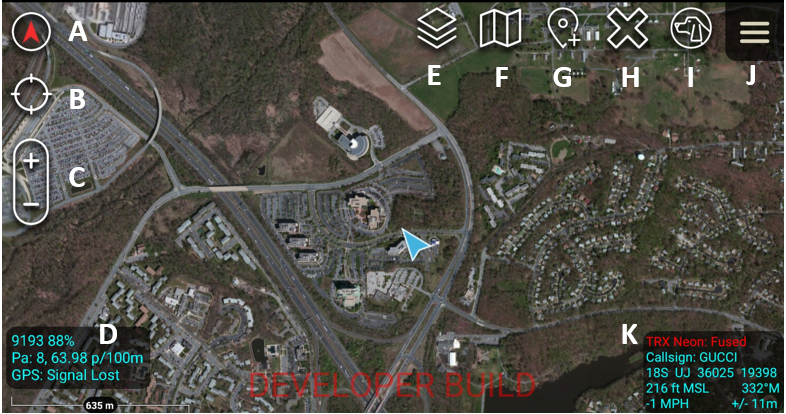
Each element in the visualizer is labeled in the image above:
A. The “Compass” icon orients the map in the direction of the user’s heading. A degree from North is also provided beneath the icon when tapped.
B. The “Target” icon enables users to “Lock on self” or center on their avatar and when the map is turned or moved, the avatar will return to the center of the map.
C. The “Zoom” icons allow the user to quickly zoom in or out of the map.
D. The “Map Widget” displays the following information:
- Tracking Unit Information: Serial Number and Power Level
- Pace Count: Steps and Pace per 100 meters
- NavWar Data: GPS Status
This information can be displayed or hidden from the TRX NEON Location page under Settings > Map Widget.
E. The “Overlay Manager” allows users to hide or show placed Markers, Navigation items, Hashtags, as well as enable or disable Data Packages, Elevation Data, Map Controls, NEON Buildings and Other Overlays.
F. The “Map Tool” trifold icon opens to “Imagery”, “Mobile” and “Favs” menu options and allows users to select the base map imagery. Users can scroll through the available options and download package imagery for offline use.
G. The “Point Dropper” icon allows users to place markers on the map. Users can organize the place markers into categories in the Icon Pallet menu.
H. The “X” icon allows user to drop an “X” anywhere on the map. It can be used as a quick navigation function or method of marking areas of interest on the map.
I. The “Bloodhound” tool pairs to any map item to navigate to and provides distance, direction and time of arrival information.
J. The menu icon opens to all ATAK menu options. Your options may vary based on which ATAK plugins you have installed.
ATAK menu options:
- Alert
- Brightness
- CASEVAC
- Clear Content
- Contacts
- Data Packages
- Drawing Tools
- Elevation
- Fire Tools
- First Person
- Gallery
- Geofence
- GoTo
- Import
- Lasso Select
- Orientation
- Plugins
- Quick Nav
- Quick Pic
- Radio Controls
- Range Tools
- Resection
- Routes
- Rubber Sheet
- Track History
- Video
- TRX NEON Location
- Settings
- Quit
Note: Users can select the TRX NEON Location menu option to open the NEON PT MIL plugin sidebar. This is where users can connect to their NEON Tracking Units and review their NEON settings. These menu items can be reorganized by selecting the pencil icon, selecting and dragging the icons in the desired order, and then saving the Toolbar profile. You then can select between the different profiles by clicking the gear icon.
K. The “Location Widget” field displays the following:
- “TRX NEON” reporting the strength of connection to the tracking unit
- Callsign
- Location
- Speed
TRX NEON Location Page
To open the TRX NEON PT-MIL plugin sidebar, users should open the menu icon and tap on the TRX NEON Location menu option highlighted in the image below.
![]()
Each element of the TRX NEON PT MIL PLugin sidebar in the visualizer is labeled in the image below:
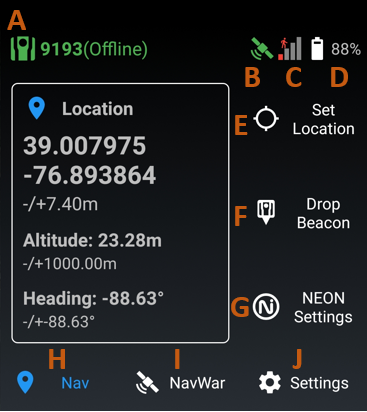
A. The Tracking Unit connection status is displayed as
- Red + Disconnected - There is no Tracking Unit selected or the Tracking Unit is not connected to the EUD.
- Yellow Device ID + Unauthorized - Tracking Unit is paired, but the NEON PT MIL software is not authenticated and users are unable to track.
Note: To be able to begin tracking, users should log into their NEON account or connect an offline tracking unit.
- Green Device ID - Tracking unit is successfully paired and connected
Note: If tracking unit connection status displays the device ID (serial number) in green and (Offline) as pictured above, that means the NEON Location Service has been authenticated using an offline license that is loaded onto the Tracking Unit. This does not mean the user is operating in offline mode.
B. The “GPS Status” is displayed here and users may see the following colors. The color indicator informs the user of the quality of GPS:
- White - Unknown
- Purple - No signal
- Yellow - Jammed
- Orange - Repeated
- Red - Spoofed
- Green - Normal
C. The Inertial status displays four bars that correlate with Poor, Fair, Good or Excellent inertial status. We recommend an Excellent inertial status (4 bars) for best tracking results and location accuracy. If a user’s inertial status is Poor, and the user has GPS with a clear sky view, then they should walk around to obtain a 4 bar lock. Otherwise, they should perform a 3 point check-in to acquire a 4 bar inertial status lock. The inertial status translates to the following:
- Poor - less than 100 meters dead reckoning capability
- Fair - about 100 meters dead reckoning capability
- Good - about 250 meters dead reckoning capability
- Excellent - about 500 meters dead reckoning capability
D. Tracking Unit Power Level displays the power level of the connected tracking unit.
E. The Set Location button allows users to set their location anywhere on the map. User’s should place themselves inside the circle of the target icon.
F. The Drop Beacon button allows users to drop a TRX UWB beacon where they are currently and share the location of the beacon with other users on their subcription or custom Ultra Wide Band network.
G. The NEON Settings button allows users to access their NEON Settings page to setup their Trackung Unit, access the NEON Account Login page, configure UWB Network, configure GPS Settings, view NEON Location Service Version, access the TRX Beacon Updater tool, Send Feedback (send a bug report), view Open Source Licenses and view NEON End User Agreement.
H. The Nav button selector allows users to view the navigation information including Location, Altitude, Heading, and Pace.
I. The NavWar button selector allows users to view the GPS Status, set Display options, Clear GPS History, and update Messaging Settings.
J. The Settings button selector allows users to set their preferences in ATAK.