Connecting to the DAGR
The Defense Advanced GPS Receiver (DAGR) is a secure handheld GPS receiver that can be configured to be used with NEON PT-MIL in rugged military environments. Visit Configurations for more information on alternative NEON PT-MIL setups. The following procedure outlines setting up a Full Nett Warrior vest with DAGR.
Steps to Connect to DAGR
There are three main devices to be connected in the full Nett Warrior NEON PT-MIL + DAGR setup. Those connections are highlighted below. Each cable will allow for charging.
-
Connect EUD to D.O.C.K. Lite and then using a Nett Warrior cable, connect the Dock Lite to the EUD port on the Nett Warrior Hub. The Dock Lite will provide power and data to the EUD.
-
Connect Tracking Unit to ATAK using either a wired or Bluetooth connection. Visit Connecting to a Tracking Unit for more details.
-
Connect DAGR to Nett Warrior Hub using the Star-Pan DAGR GPS/Navigation cable. Attach the J2 end of the RS422 cable to the J2 port on the DAGR and then connect the Star-Pan to USB port adapter to the USB end of the RS422 cable. Finally, connect the NW end of the Star-Pan cable to Pan Port 1, 2 , or 3 on the Nett Warrior Hub. When the connection is secured, a pop-up will appear on the EUD asking for confirmation to connect to external device. You should tap Allow.
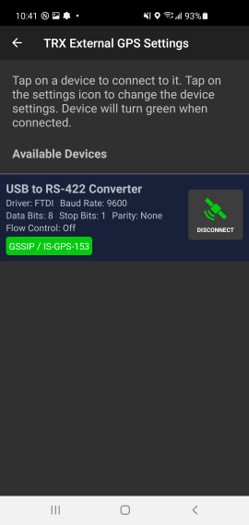
Note: Verify the connection with the DAGR by navigating to the NEON Settings and select TRX External GPS Settings. This menu item is only displayed when an external GPS source is connected to the EUD.
-
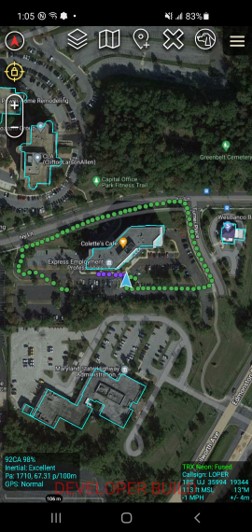
Navigate to TRX NEON Location menu on Android to view the connection status.
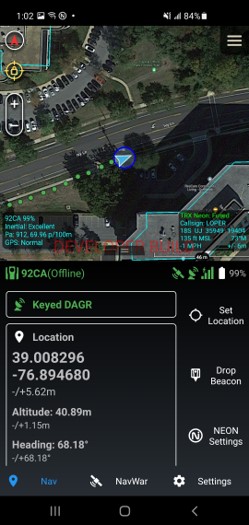
The DAGR is now successfully connected to the EUD and can be used to map GPS status.
Note: You may need to enable Jammer Finder settings on your DAGR.