User Interface
NEON Command is a crucial component of all NEON functionality. From creating buildings to reviewing logs, it is important to know how to navigate around the program and understand the various parts. This article will explain where to find different features, how to use controls, and what the different indicators mean.
Visualizer
The visualizer is the main visual component of NEON Command. It is a map viewer that can overlay 3D buildings, user paths, as well as a number of other features.
Controls
The visualizer has a few basic on-screen controls as well as mouse controls. Most of the on-screen controls can be found in the top right of the window. The two curved arrows rotate the display clockwise and counter-clockwise. The button labeled as 2D or 3D will toggle the display between a 2-dimensional view and a 3-dimensional view. In 3D mode, the button beneath the 2D/3D button will toggle terrain on and off. Use the + and - buttons to zoom the camera in and out. In the bottom right corner of the screen is a compass that also shows the tilt of the camera. Click it to return to a north-up view.
TIP: Turn on terrain when adjusting the height of a building, floor, or region. This will be helpful to avoid sharp drops in paths when users exit buildings.
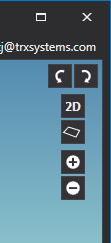
The mouse can be used to pan, rotate, and zoom the map. Left-click and drag to move the map around. Right-click and drag in 3D to rotate the map. The scroll wheel can be used to zoom. A right-click will bring up a context menu with available actions.
Maps and Layers
NEON uses satellite images provided by Esri by default, but others can be selected. The base map can be changed by selecting a different one in the drop-down menu called Maps, which is found in the top left of the visualizer. Users can add “Custom Options” to the selection as directed on the Custom Tile Sources documentation. The default options are as follows:
- None - Removes the map and displaces a dark grid.
- Satellite (Clarity) (Default) - Displays the satellite images that are the clearest and most top-down perspective. Provided by Esri.
- Satellite (Latest) - Displays the latest available satellite images regardless of perspective. Provided by Esri.
- Street Map (US) - Displays a street map with a slight indication of terrain. Provided by Esri.
- Street Map (World) - Displays a contour street map. Provided by Esri.
- Open Street Map - Displays a publicly-sourced street map. Provided by Open Street Map.
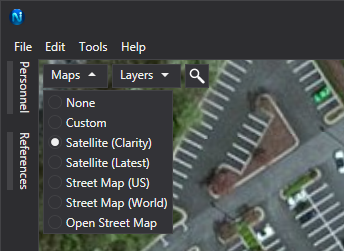
TIP: If working in a newly constructed building, try looking at different maps to see if the building is visible in one of them.
Next to the Maps menu is the Layers Menu. This menu enables and disables various objects in the visualizer. There are four categories of layers and additional layers which will be available when viewing things such as signal maps. The four standard layer categories are as follows:
- References - Controls TRX anchors, BLE beacons, NFC tags, user-defined waypoints, debug NFC tags, and user-defined debug waypoints.
- Buildings - Controls buildings, and floorplans.
- Personnel - Controls avatars, paths, error bounds, and labels. With these layers enabled, they can also be toggled on an individual user level in the Personnel Sidebar.
- Features - Controls indoor and outdoor map status, stairwells, escalators, elevators, entrances, and ramps.
Search
To the right of the Maps and Layers menus is the search feature. Click the search icon to expand the text box. As an address is entered into the search bar, potential matches will appear below it. Click a match to center on that location, or press “Enter” to center on the first match. To view recent searches, click the down arrow at the end of the search bar.
Buildings
Buildings created in NEON can be identified by their outline and semi-transparent white fill. The layout of the primary floor (typically the first floor) will be used to represent the building when it is not selected.
Left-click on a building to select it. This will display the floor plan on the primary floor and bring up the floor selector on the right side of the window. Any features or references associated with the floor will also be visible. In very tall buildings, hover the cursor over the floor selector and use the scroll wheel to be able to view all of the floors. After selecting a floor, the up and down arrows on the keyboard will select the floors above or below the current one.
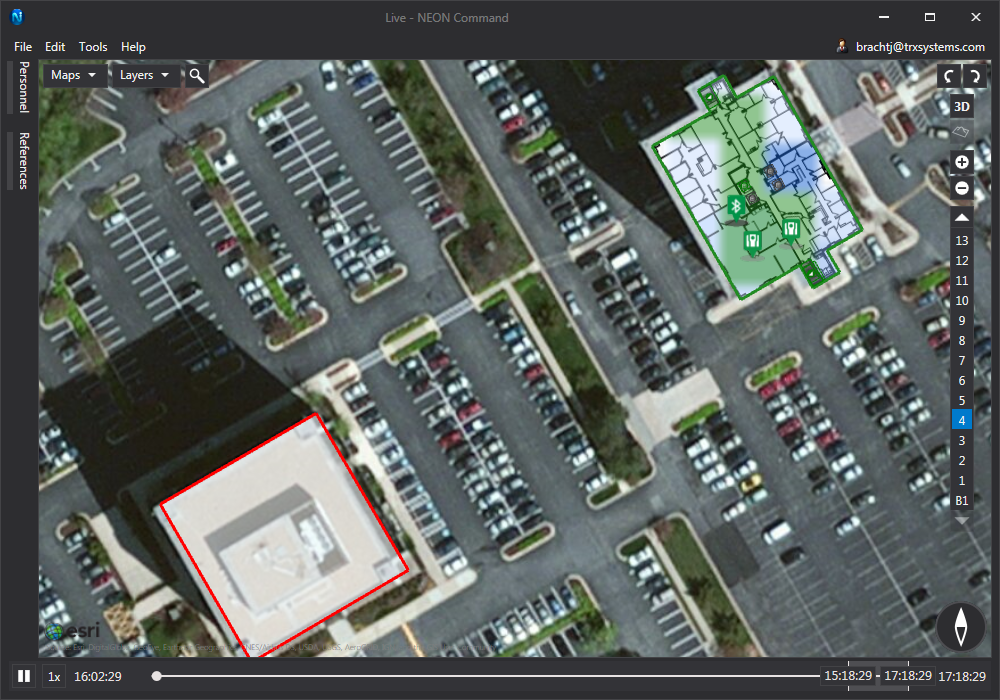
If viewing a building in 3D, only the selected floor’s floor plans will be visible. All features will be visible in 3D. The layout of each floor is visible in 3D to help distinguish floors. By default, the vertical visual scale is set to 3, which may make buildings and terrain look taller than normal. This can be changed in “Edit > Preferences”.
Sidebars
On the left side of the windows are the sidebars. The sidebars are used to show a list of items of a given type and some additional functionality. Sidebars will collapse after clicking on the visualizer. To keep a sidebar open, click the pin icon in the top right of the sidebar.
Personnel Sidebar
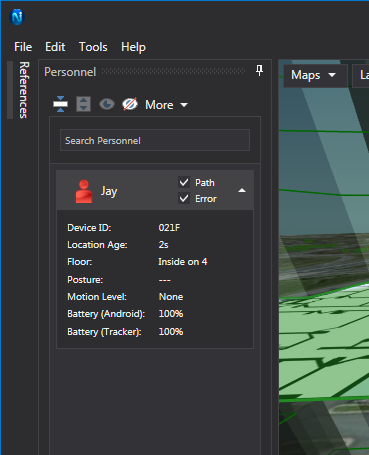
This sidebar displays a list of all personnel who are or were active in the time frame of the playback time bar. Adjusting the start time may change the list of personnel. The name of the personnel is their tracking unit serial number by default, and it can be changed in the setting menu of the app that they are using. This is also where the user’s avatar color can be set. To hide a user from view, right-click on their name and select “Hide”. All users can be set to hidden or visible with buttons at the top of the sidebar.
Additional data can be viewed for each user. Click the down arrow to the right of the user to expand their information card. Actions to expand and collapse all information cards can be found at the top of the sidebar. The data shown in the information card applies to the end time of the time bar. The information that is displayed is:
- Device ID - Serial number of the user’s tracking unit.
- Location Age - How long-ago location data was received from the user.
- Floor - Floor the user is on or if they are outside.
- Posture - Posture of the user (e.g., on the back, prone, on the left side, on the right side, upside down, upright, and vehicle).
- Motion Level - Movement level of the user (e.g., none, low or high depending on how quickly the user is moving).
- Battery (Android) - Battery percentage remaining in the android device.
- Battery (Tracker) - Battery percentage remaining in the tracking unit.
If a user’s location age grows to 30 seconds or more, a warning indicator will appear next to their name to indicate they have disconnected. The user’s avatar will also blink in this case. This may occur for a few reasons: (1) either they have lost connection to the internet or cloud; (2) or the tracking unit or Android battery has died.
A user’s path or error bound can be toggled with the checkboxes next to their name. Actions to enable or disable all users’ paths and error bounds can be found at the top of the sidebar under “More”. Enabling a user’s path will display a line in their color everywhere that the user has been during the session. Enabling a user’s error bounds will display a circle around the user’s avatar to show the potential error in the 2D location solution.
Right-click on a user for additional actions such as Center, Follow On, and Highlight. Clicking “Center” will center the visualizer on a user’s location at the given time. Clicking “Follow On” will center on the user but will stay centered on the user as they walk around. Clicking “Highlight” will follow a user and also hide all of the other users.
References Sidebar
The References sidebar displays a list of all references currently placed in the subscription. References are listed first by type and then alphabetically. The type order is TRX Anchor, NFC Tag, Waypoint, BLE Anchor, Debug Waypoint, and Debug NFC Tag.
For additional information about a reference, click the down arrow on the right side to expand the information card. This information listed here is the Type, a unique ID, and the latitude and longitude coordinate. Waypoints will also list the name. Controls to expand and collapse all of the reference cards can be found at the top of the sidebar.
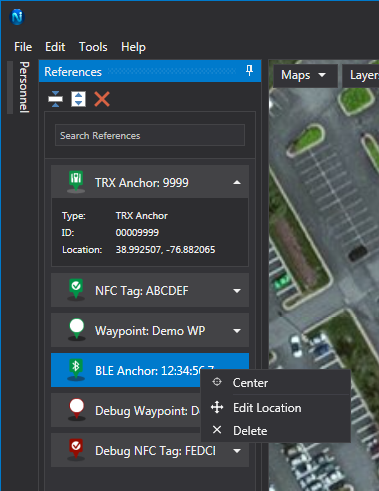
Right-click on a Reference for additional actions. Click “Center” to move the map to the reference’s location. Edit Location will bring up another window that displays the latitude and longitude as editable text boxes. There will also be a drop-down menu to change the floor of the reference. References can also be set to outside. Click OK to save changes.
To delete a Reference, right-click on it and select “Delete”. This can also be done by selecting the reference in the sidebar, and then clicking the “Delete” button at the top. To delete multiple references at once, hold “Shift” or “Ctrl” to select multiple references, then click the “Delete” button at the top of the sidebar.
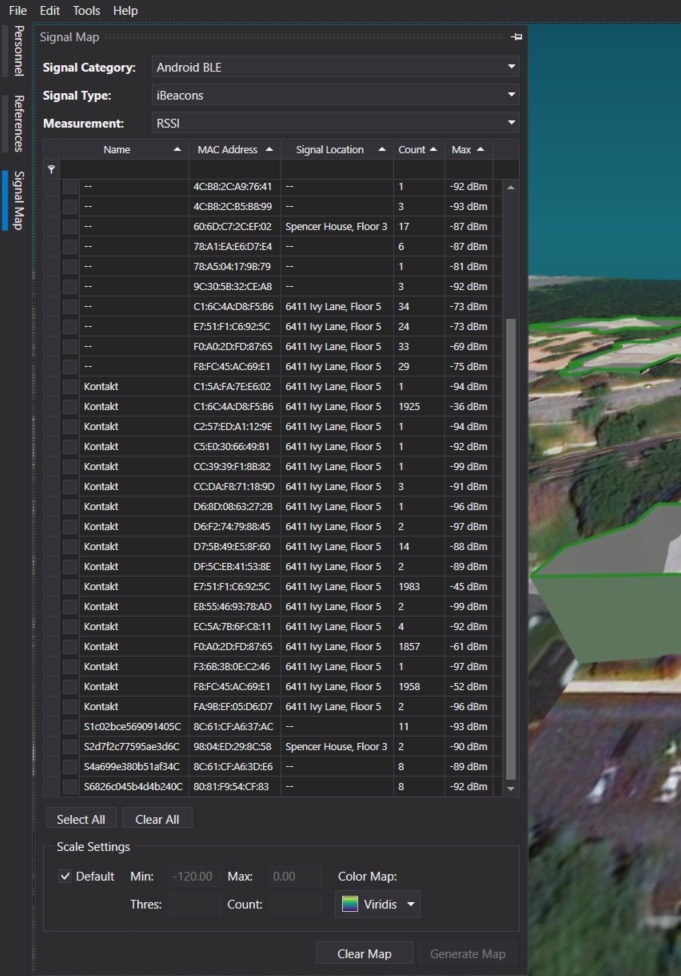
Signal Map Sidebar
The Signal Map sidebar is available when viewing a signal map.
Miscellaneous
Menus
Information regarding the menus can be found in the Menus documentation.
Length Measurement
To easily measure the distance between two points, hold “Ctrl” and right-click on the first location. Dragging the mouse will display a line between the first point and the cursor. The distance will be displayed above the cursor. The units of these measurements can be changed in “Edit > Preferences”.
Playback
Information about the playback bar at the bottom of the window can be found in the documentation for Viewing Tracks.