Path Adjuster
The Path Adjuster tool in NEON Command allows users to make minor 2D touch-ups to a signal map path. This helps to straighten up or fix paths that might be on the wrong side of a wall or don’t line up exactly with a structural feature. The adjustments made by this tool are intended to be minor. Major changes may drastically affect the accuracy of the path.
Basic Controls
To open the path adjuster tool, right-click on an avatar on the screen or in the personnel sidebar. When the tool opens, the path will be displayed as a series of points with a line connecting through them. If a point is blue it means that it is an anchor point and will not be affected by changes to the path unless the user moves that point. Gray points will be scaled, rotated, and translated based on changes made to the nearest anchor points on either side of it. Click a standard gray point to turn it into an anchor point. To change an anchor point into a normal point, right-click on it and select “Remove Anchor Point”.
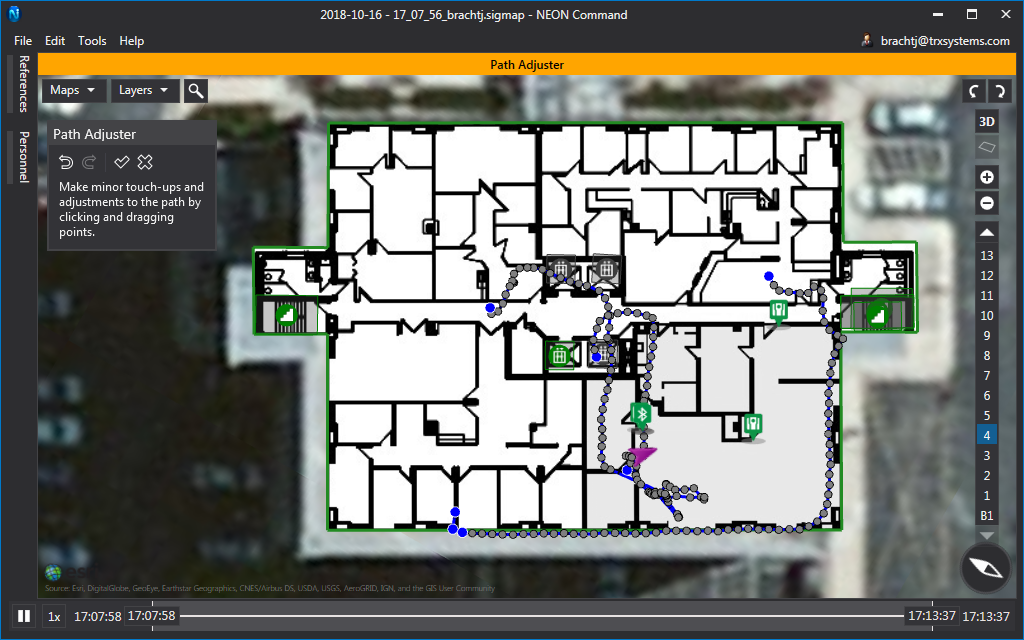
When the path adjuster tool is open, anchor points will be set at natural breakpoints such as floor transitions and building transitions. Additionally, an anchor point will be set anywhere the user checked in during the signal map.
Methodology
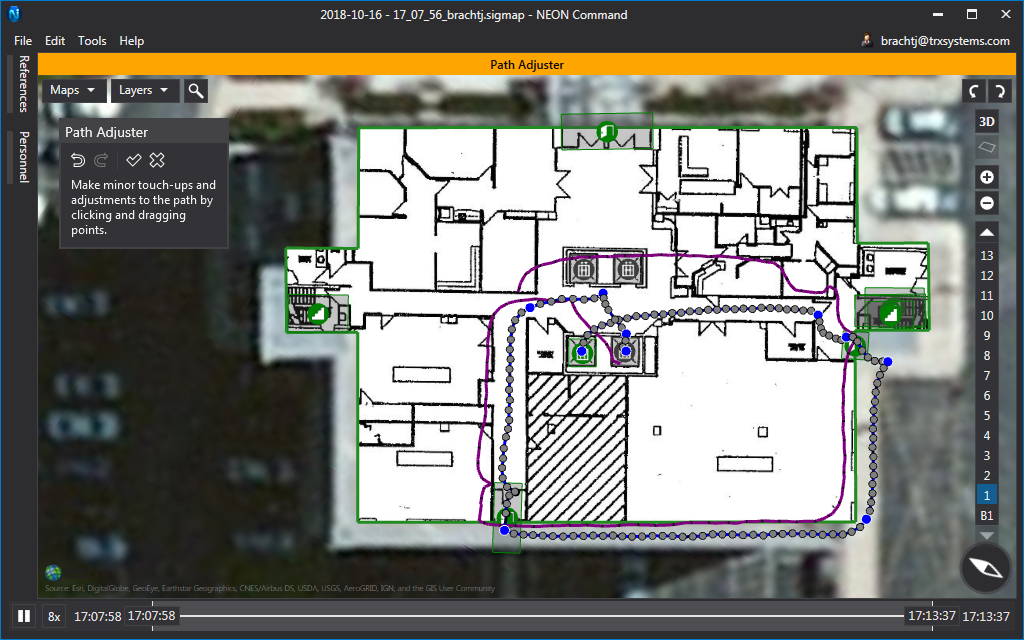
While using the path adjuster, it may be difficult to determine how each path point should move in order to accurately match the actual walked path. Below are some of the best practices to follow in order to achieve accurate results.
-
Use as many anchor points as are needed to properly adjust the path, but avoid anchoring all or most of the points. Too many anchors may remove some details found in the NEON solution.
-
While moving points, the original path will remain in place as a purple line. This can be useful to see how a path has been adjusted.
-
While moving an anchor point, if another path segment changes unexpectedly, set an anchor point in that segment and then try moving the first anchor point.
-
Floor transitions will cause the path to break and set an anchor point. Move the anchor point at the end of a path segment to the appropriate elevator, stair, or ramp.
-
Doorways are natural choke points and paths tend to characteristically bend through them. Look for these patterns and match them to the doors on the floor plans.
-
Corners are good known locations to set an anchor point. It is generally easy to match a path going around a corner to the corner on the floor plan.
-
If a path goes between more than a few floors with an elevator, there is typically a path point on each floor in between. It is recommended that these standalone points are moved to match the points on other floors.
-
If there are large gaps between points in a given path segment, it is typically an indication that this segment is overscaled and should be made smaller.
Saving
Once the path has been properly adjusted, all changes must be confirmed in order to view the path as a signal map. To confirm the path adjustments press “Enter” or click the “Apply” button in the Path Adjuster toolbox. Once the changes are applied, the signal map will open with the adjusted path.
Any path adjustments made are only stored locally and will not persist when reopening the signal map. In order to continue using the Adjust Path, the signal map must be saved locally before closing. To do this, click “File > Save”.