Offline Mode
Offline Mode is a mode of the NEON software that allows you to explicitly disable all communication with the NEON Cloud. In offline mode, map data such as buildings and floor plans must be exported from NEON Command and side loaded onto an Android device for use in a NEON application, rather than transferred via the NEON Cloud. All interaction with this map data is done purely client-side.
Note: Offline Mode will still make online connections to retrieve satellite imagery from your configured imagery provider, as well as terrain data from the configured terrain provider. If the search bar is used and the PC is connected to the internet, it will make online connections to fulfill the search request.
Offline Mode is enforced on a subscription level. If you wish to change your subscription to operate in offline mode, you can email support@trxsystems.com and we can enable the Offline Only mode on your subscription.
The following tutorial will explain how to use NEON software in offline mode. Including how to transfer data between devices. This tutorial can be used by both Signal Mapper and Personnel Tracker customers. Some sections may have a note that they apply to specific NEON applications and may not apply to your use case. In these cases, a link will be provided to the proper section.
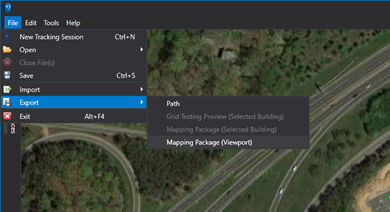
Export Your Buildings
In order to load your map data on android, it first needs to be exported from NEON Command. To export your map data:
- Select a building that you wish to export.
- Click “File > Export > Mapping Package (Selected Building)”.
- In the “Save” dialog, choose a file path, and click “Save”. The building will be saved as a .maps file.
After saving, a dialog box will pop up to list the contents of the building that were saved.
Load Your Buildings onto other Computers
In the event that you are using multiple computers running NEON Command, you will need to import your building on the other computers. If you are only using one PC, please skip to the next section. Without importing your building, you will not be able to view any data taken in that building, and Signal Maps will not render properly on other computers. Follow these steps to import your map data onto other computers:
- Transfer a copy of your .maps file to the other computers, for example, by using a USB drive.
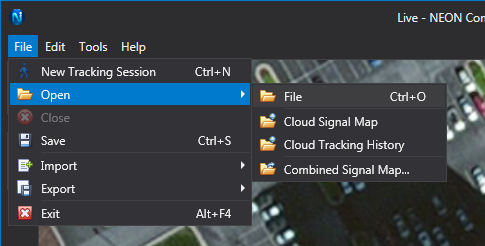
- Click “File > Import > Mapping Package”.
- In the file browser, select your .maps file and click “Open”.

Now that your building has been imported, repeat the steps above for as many computers as you would like.
Load Your Building onto Android
In order for buildings to be loaded on to Android in offline mode, you must place the exports into a specific folder in the Android file system. Any Buildings placed into this folder will be loaded on the startup of the NEON Applications. To do this:
- Turn your Android device on and plug it into a Windows PC with USB.
- Set your phone to transfer files over USB. The process of transferring files differs with various devices and Android versions. An option for this USB setting can typically be found in the notification tray, but check with your device manufacturer if you can’t find it.
- In the Windows File Explorer, open your Android device’s internal file system. The device should appear in the navigation panel on the left side of the window.
- Find the top level of file folders on the device. You should see other folders such as DCIM, Download, and Android.
- Locate the “Maps” folder by following this path: Android > data > com.trx.neon.locationservice > files > NEON > Maps.
- Copy and paste your offline .maps file into this folder.
- After the file has been transferred, you can disconnect your phone.
You will need to repeat these steps for all devices that will be using Offline Mode.
Note: The NEON/Maps folder is automatically created the first time you log in to Signal Mapper or Personnel Tracker.

Signal Mapper Solution
This section only applies to NEON Signal Mapper. If you are using NEON Personnel Tracker, you can skip to that Personnel Tracker Solution section.
Now that your building has been loaded onto your phone it will show up when you open Signal Mapper. The building will be shown with a red outline.
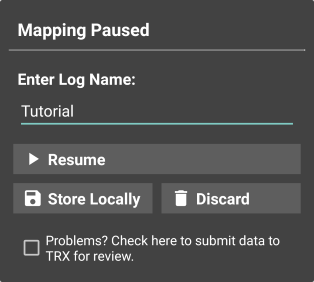
Note that you cannot upload your signal map to the NEON Cloud upon finishing mapping while in offline mode. In order to save signal maps locally you will need to follow the following process:
- Signal map as you normally would. See our Signal Mapper documentation for more information.
- Press the stop button to finish mapping.
- Choose the “Store Locally” option to save your signal map to your phone. You can add a name to your log if you would like.
Repeat these steps for as many signal maps as needed.
Viewing a Signal Map in NEON Command
Now that you have taken all of your signal maps, it is time to view them in NEON Command. To do this, you will need to download them from your Android device onto your computer, then they can be opened as a local file in NEON Command.
- Plug your Android device into your computer via USB.
- Set your phone to transfer files over USB.
- In the Windows File Explorer, open your Android device’s internal file system and navigate to the “NEON” folder.
- Locate the “SignalMaps” folder by following this path: Android > data > com.trx.neon.locationservice > files > NEON > SignalMaps.
- Open the “SignalMaps” folder. Here you will find all signal maps that were stored locally.
- Select and copy the signal map file (.sigmapx) that you just created. Paste them onto your computer in the location of your choosing. Any pictures taken during your mapping will also need to be copied.
- Open NEON Command and click “File > Open > File” (or press Crtl+O).
- In the file browser, select the file you just saved and click “Open”.
- You can now review your signal map as needed. See the signal map documentation for more information.
Personnel Tracker Solution
This section only applies to NEON Personnel Tracker. If you are using NEON Signal Mapper, you can jump to the Signal Mapper Solution section.
Now that your building has been loaded onto your phone it will show up when you open Personnel Tracker. The building will be shown with a red outline.
Personnel Tracker
When tracking any number of people, it is important to make sure they are all using the same environment information. Gather up your Android devices and do the following:
- Connect an Android device to your computer via USB.
- Set your device to transfer files over USB.
- Locate the “Maps” folder by following this path: Android > data > com.trx.neon.locationservice > files > NEON > Maps. ‘
- Open the “Maps” folder. If the folders do not exist on this device, create them.
- Copy all of the .maps files you exported from NEON Command and paste them into this folder.
- Disconnect your Android device.
Repeat these steps for as many devices as needed. Now when these devices run Personnel Tracker, they will all be using the same building models, features, and references. With all of your devices ready, you can run them with Personnel Tracker as many times as you would like.